Thursday 30 October 2014

Liesl+Co Cinema Dress: with Queen Sue's Laura Ashley fabric

As soon as I saw the Cinema Dress come up as a new pattern release in Liesl Gibson's Instagram feed, I knew I was going to make it.  I love long dresses and here was a pattern with a long hem, a gentle princess line seam over the chest (easy to adjust for a small bust) an a line skirt, and a yoke- I love a yoke!  It is at the higher price end for a PDF pattern but it is extremely well designed and well written, and having made a lot of PDF independent designer patterns, I could really see the difference especially in the instructions.


Every detail is covered including all the seam finishing for each and every seam.  When pockets are fitted into a seam, I always have to think carefully how they will be finished- what will be enclosed and at which stage; some bits need finishing before they are sewn, some after- but no worries with this pattern as Liesl tells you what to do and when to do it.    


I did reduce the curved seam over the bust by a small amount.   I didn't make a tester dress, I was confident this was going to work and that there would be enough room in the seams to tweak the sizing.  I had seen Daniela's version at Ivy Arch and checked her sizing and it confirmed my hunch that I would be a size 2 on the upper body and size 4 at the waist and hips.  Like her, I omitted the notch.  I don't like to wear low cut styles- not a great look for me.  The alteration is a cinch to do- you just keep sewing along the curved seam rather than creating the notch.  I didn't make any further alterations.  I made the longer version, view B.


The contrast material is a gorgeous piece of mid 1970s  Laura Ashley cotton with a print reminiscent of the wonderful Bath costume museum exhibition from last summer.    I won it rather fortuitously at the very first Sewing Directory Exeter meet up and donated by Queen Sue- she knows who she is.   I've been saving it for something special and this is exactly the right dress for it.


The blue fabric is Robert Kaufman Interweave Chambray in Royal.  It is heavier than many of the floaty RK indigo chambrays around at the moment but still soft and a great weight for cooler weather; easy to work with too.


I even conquered the crappy buttonhole setting on my Janome by using a rounded end buttonhole and foot pressure reduced to 1 so the fabric didn't get stuck and mess the sensor up- for anyone with a Janome with an automatic buttonhole, I hope that makes sense.


I have slight reservations about the welt pocket placement- you know what I'm saying, but they are neat and useful so I'll take my thoughts out of the gutter.  There's a strong 1970s vibe with this dress, especially with the fabric choices, and maybe a touch of the Prairie too, and you know that all adds up to an aesthetic that I feel very comfortable with.
You can find a Sew- along for the dress here.  Liesl's pattern has its origin in the girl's version of this style, 'Hide and Seek Dress'.   Thankyou to my daughter as ever for using her GCSE iArt/photography skills with the pics, taken a few weeks back xxx

sib blog

Monday 27 October 2014

October at Eternal Maker: hints of Christmas

Time for my October visit to Eternal Maker and I am feeling a little hint of Christmas as I peruse!  My daughter is keen on cross stitch so I have been looking at the embroidery section with some interest and my art was drawn in, not for the first time, to the Gera Japanese cross stitch patterns.  I mention these now in case you want to complete one for Christmas.  This one is Santa's House, it measures approximately 6" x 8".


This one is Santa has Come 2 and comes up slightly bigger  6 1/2" x 8 ½".


Both these patterns use DMC embroidery floss and Eternal Maker have a conversion chart to convert DMC threads to Cosmo threads (Lecien's stranded embroidery floss) which is a beautiful floss to use and my personal favourite when it comes to embroidery.  Is that enough Christmas or do you want more?  Just a little?  I'll mention a Scandi print in a couple of colours, Folk Art Holiday by Gina Martin for Moda, available in Scandi Christmas grey on red and the reverse colours, Scandi red on grey (love this one!).  The scandianavian Christmas aesthetic always gets me every year, along with Nigella's Christmas- the pictures and the recipes.


Let's return to more neutral colours and prints.  I have seen this a few times on my online visits and it always catches my eye, Yellow and White Scallops on natural, a Japanese linen blend.


I imagine this to be a heavier weight- think bags, purses, cushions.  If you want something a little more geometric, this is similar, yellow and grey squares on natural, again a linen blend.


And for a touch of cute with a neutral colour way, Lions by Cocoland


You can see this print in extreme close up too!


The seasonal colours of this beautiful Autumn Lily Red Blackbird fabrics bundle were begging to be included, the russet warm reds have a great Autumn feel.  The print in the centre is my favourite and you can find the individual prints here.


Sweetwater produce great text prints, and Elementary is no exception. 


The top print is my favrouite here although there eis a lot to like in all of them.  Many of these would work very well as quilt bindings and borders.  You can see these and other prints from this range here, and check out the turquoise prints (the colour is called 'Splash').  This is Measure Up:


And this beauty is called Calendar:


And to end, a technicolour, Kawaii cute girly bundle picked by Eternal Maker Staff, Unicorns and Rainbows:


Enjoy!
sib blog

Friday 24 October 2014

318 Patchwork Please Winner!

Congrats to Ali, comment 133 was chosen as the winner!  I've sent you an email Ali...

Thankyou to all those who took part.  There are lots more chances to win on the blog hop and the publishers are happy to send books anywhere so all are welcome!

sib blog

Thursday 23 October 2014

October at Village Haberdashery: It's all about the checks...

Time for my October visit to Village Haberdashery.  Annie is just on her way to Quilt Market trade show in Houston to plan for next year's fabric (you can see a preview peek of what she has in mind here) so I'll concentrate on what's going on now starting with check/plaid shirtings from Robert Kaufman


I haven't actually felt seen these in person, but I am imagining a soft, light weight Viyella style cotton like you see for men's country style shirts.  We have a local shop called, Farmer's Friend which is obviously aimed at the more rural community and there are check shirts a-plenty in the shop of this kind of fabric.  If you thoughts are turning to Christmas makes, plaid PJ pants would make a great male gift,although they do use a lot of fabric!   Boxer shorts are a more economic alternative.   If you fancy a male check shirt , Colette's classic  Waldon Negroni pattern and you can find a very detailed  men's shirt sew-along using Negroni with Peter Lapin's excellent Male Pattern Baldness blog.


Rather wear those checks yourself- I don't blame you! Annie has just received delivery of Grainline patterns including the classic Archer shirt pattern- very detailed sew along at Grainline.


And the Dahlia  dress pattern, released this week by Colette in return to what they do best, dresses with vintage styling and modern wearability, is a perfect candidate for a soft plaid shirting.  I am sure Annie will have this in the shop soon and if you are an ardent cutter/sticker type, the PDF download version can be bought here.  Otherwise, scarves, cushions, children's clothes- plaid/check shirting is a beautiful useable fabric.
Annie is something of an early adopter as she showed with her exclusive coup of been the first shop in the world to receive delivery of Caroline Friedlander's Doe collection


On of her new ideas really caught my eye, Baby Quilt club:
Sign ups are here and there is a multitude of options to tailor this club to your baby quilt needs.  Annie has put together some sample bundles to give you an idea of what to expect:


- you can choose monthly, every two months, boy or girl or a mix of selections, option to include co-ordinating Kona solids.  Great idea Annie!


A random insert here, I saw this during one of my frequent browses in the Chambray section (I've mentioned my love for Chambray so many times) and I chanced upon this beauty, Chambray jacquards in Indigo, which I have not seen anywhere else either as fabric or sewn up into a garment or quilt:


Jacquard means that the lighter colour weft threads float over the darker warp to produce the pattern.  A beautiful effect, delicate and a bit of a nightmare whilst cutting and handling- like the Chambray dot that I used for an Alder dress, but once it is sewn up and the seams are secure you are onto safe territory.  This jacquard chambray's just a little heavier than the dot and I will say, I hear it calling me!  Just not sure if it will survive contact with a cat!  Whilst I am netioning the Alder dress, that particular Grainline pattern is also currently in stock.  I reviewed it here and made a second version here.  The Grainline sew-along is here.


For Autumn/winter wear, I would make this as a dress to wear over a thin jersey top and stick a cardi over too!   Remember to keep your sizing on the more generous side if you are going to wear something underneath. I would do this by using the pattern I've already used but a less generous seam allowance on the side seams just for extra wiggle room.  Maybe in corduroy?


This is Sevenberry navy plaid, super soft and lovely for shirts, shirt dresses etc. 


This is Sevenberry blue and green check, a smaller scale pattern.
I've given myself ideas in this post, I feel like I can't get away from checks and shirts!  It's all about the bass  checks…  Enjoy x

sib blog

Wednesday 22 October 2014

Suzuko Koseki Paper Piecing Bundle

I'm on half term and I am working away on some paper piecing projects including something for Fat Quarterly.  For the fabric, Becca of Sew Me a Song gave me the chance to make up my own Suzuko Koseki bundle, I could even get very fancy and say curated- I'm imagining myself stroking a London style beardy chin just writing the word, although its not quite the same image on a forty-something woman as it is on a young male hipster.  Anyway, I leapt at the chance and it arrived today.  I am thrilled and I love it. Twelve beautiful fabric fat quarters of rich colour saturation featuring my favourite fabric designer. 


The daisies are a new Suzuko Koseki print and I new I had to include them.  My other choices reflected a mix of colours, large, medium and small prints, light, bright and dark colours and a range of text prints.  I'll be using a neutral background with these to showcase their finery.  The Fat Quarterly project won't be for a while yet, but if you want to get your hands on this bundle, the lovely Becca has it listed in her shop right now!  Here as fat quarters and here as fat eighths.  You will find yardage of the different prints in her shop.

sib blog

Monday 20 October 2014

318 Patchwork Patterns: How to Freezer Paper Piece

Welcome to the first stop on the  318 Patchwork Patterns: Original Patchwork & Applique Designs blog hop.  I have been a fan of this book for so long, first the original Japanese publication by Kumiko Fujita and the reissue and translated version reprinted by Zakka Workshop/World Book Media.  At the end of this post, there is a giveaway to win a copy of 318 Patchwork Patterns and all are welcome to enter, the winning copy will be sent anywhere in the world!


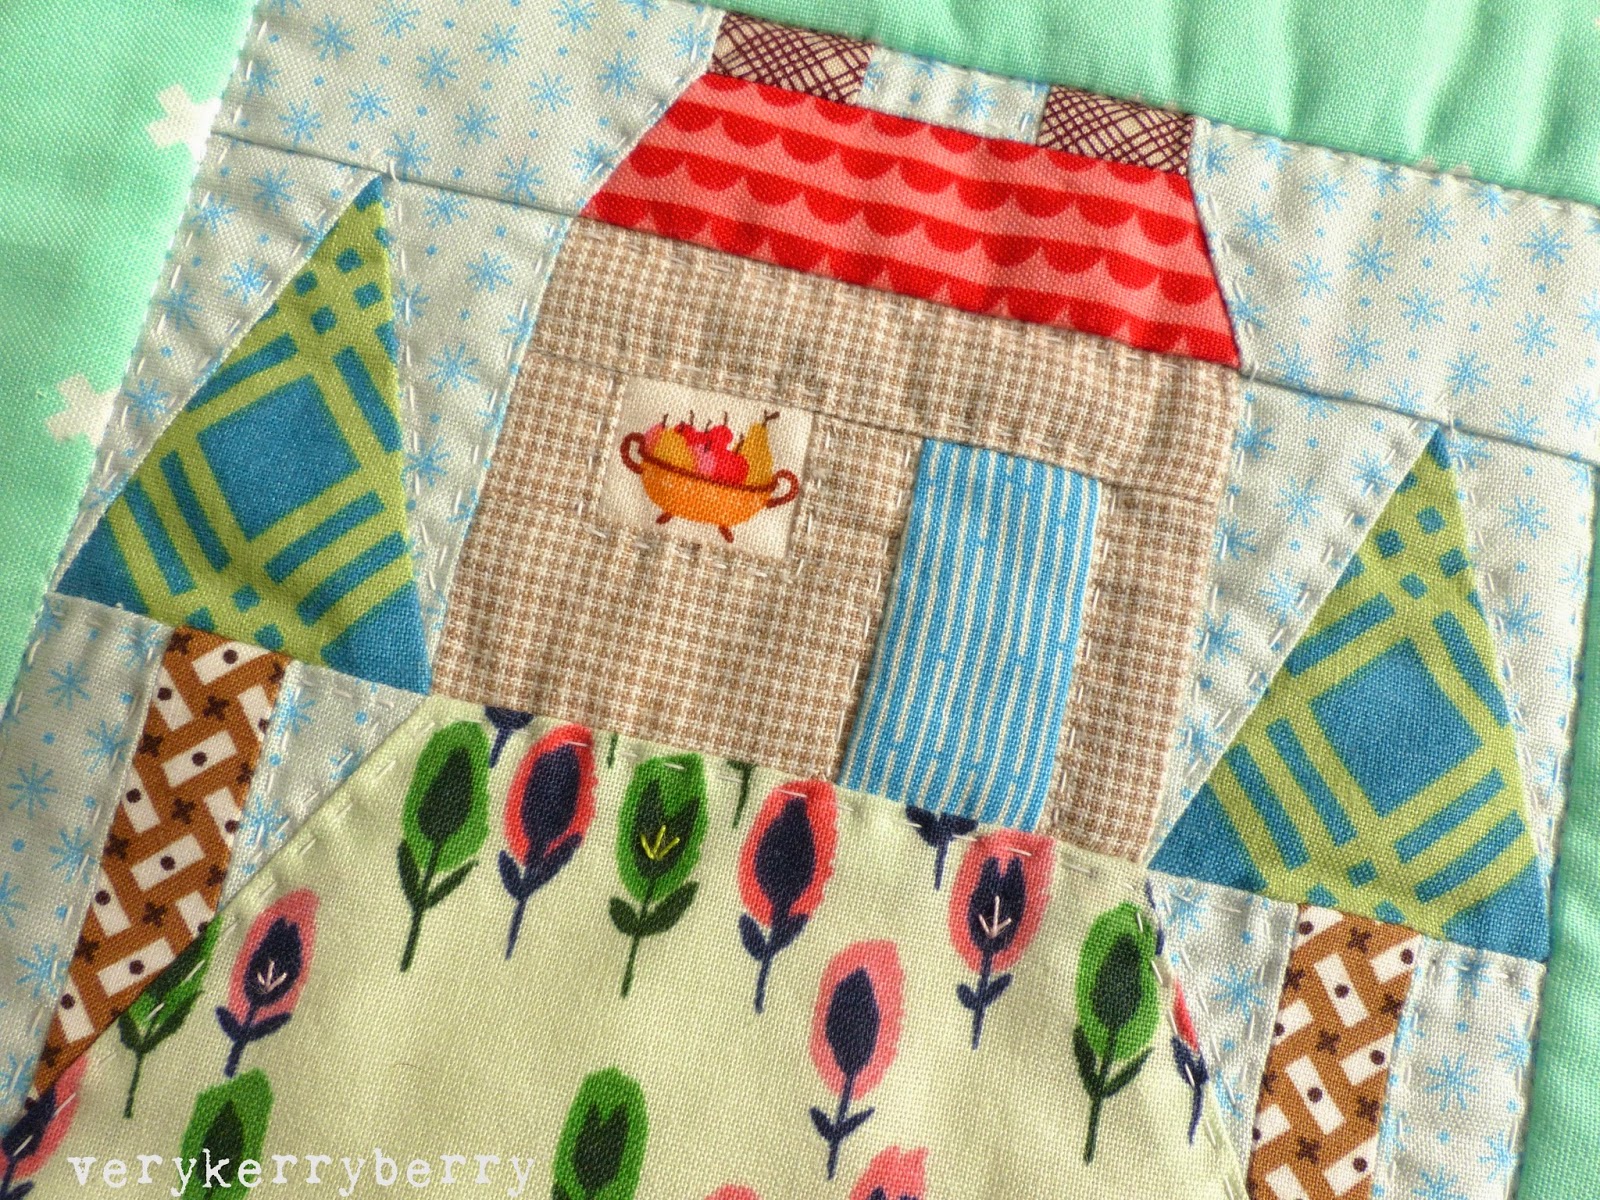
It is a book of few words but now I can actually read the brief text in the book!  More than anything else, it is a book to inspire!  It is a mix of paper pieced and appliqué designs. This blog post is going to cover two themes: firstly how to prepare and reproduce the small image in the book to make a 6" x 6" finished block; and secondly, how to sew the block using freezer paper piecing.  I am concentrating on block, #160, House on a hill and my 6" square block ended up as a small wall hanging.


The main construction method described  in the book for the pieced blocks is hand piecing but it is possible to machine piece the blocks using freezer paper piecing and even foundation paper piecing although some adaptations may need to be made on some designs.  If you want to follow the hand piecing method, Wynn has lots of hand piecing advice at Zakka Art.  You could even adapt some blocks for English paper piecing- the pin cushion block #15 from 'Sewing Goods' section would be a good example of a pattern that would work well using EPP- see Jessie's blog series English Paper Piecing Basics for this technique.

Preparing the Image
1. Enlarge: Method One, Photocopy
The majority of blocks in 318 Patchwork Patterns are 2 ⅜" x 2 ⅜" .  You can either use a photocopier to increase the size of the block by enlarging by 250%.  Technically- this will make the block slightly under 6" so if you want precisely 6", enlarge by 253%.  Now your block is enlarged.  If you want your finished block to face the same way as the drawing, the image needs to be flipped or mirror images in some way- we'll do this when we transfer the drawing to freezer paper.

2.  Enlarge: Method Two, Scan
I use a desktop scanner rather than a photocopier to reproduce the blocks and then some basic tools on my iMac to increase the image size.  I will also mention a method for a PC.  Firstly I scan the page I need.  My canon scanner scans at actual size and loads it to my desktop.  Alternatively, you could use a scanner app- I tried Cam Scanner on my iPhone and it worked fine.   Next, I use a programme called Preview that came with my iMac to isolate the design I want to use.  The scanned image will automatically open in Preview.  I choose Rectangular Selection from the selection tools.  This tool allows you to draw a border around the image that you want to select and it will show the size of the box so you can draw an accurate square or rectangle.


Once the square is drawn (shown as a dotted line around the chosen image) go to Tools and select Crop.


The image is now isolated and ready for you to 'Select All' and once it is selected, choose Copy.


You now have a picture that can be saved and is ready to paste into a document and resize.  I use a blank Microsoft Word document, paste it in and change the picture size to exactly 6" square using the right button on the mouse and choosing Format Picture and then the Size option.  I chose  6.01" to allow for the line around the block.  The advantage of using this method rather than photocopying is that there is now an option to 'flip' the image so that the design is reversed ready for piecing and the finished block will come out facing the same way as the original drawing.  In the Formatting Palette tools, you can then choose Rotation and Flip Horizontal.  


If you are using Windows, the equivalent to Preview is Windows Photo Viewer.  Choose Open from the menu bar and then Paint and you will see  rotation and flip options.

3. Trace and Number
The design is ready to number the pieces and then trace on to freezer paper.  There is no definitive method to number the pieces.  The designs in this book are too complex to be pieced in a single section, instead I usually eyeball the picture to work out how many sections there will be, give each section a letter, A,B,C etc and number the pieces.  There is likely to be a Y seam in most blocks so I keep an eye out for these too.  You can see my sections in this picture and I have numbered the top section and marked the Y seams on the chimneys/roof/sky.  You can also add tick marks to help match up tricky areas like diagonals- see section C where I have added them in blue.  There are no hard and fast rules here.  I could have sectioned the design a different way but the three horizontal sections seemed the easiest.


If the image has been flipped, you can lay freezer paper over the top so that the dull papery side is facing you and trace  transferring all the information.  If the image hasn't been flipped, lay the freezer paper on top with the waxy side facing you and use a sharp hard pencil to trace the image- then turn the paper over and write the piece numbers/sections information on the paper side- the image is now flipped.

4. Freezer Paper Piecing
i.  Once the pattern has been traced, I work on one section at a time and only cut out that section- so I don't lose any small pieces.  Each piece is cut out along the traced lined using a scalpel knife and quilt ruler.  Press the waxy side of the paper to the wrong side of your fabric using a hot iron and cut out allowing 1/4" eam allowance all round.  I use a generous 1/4" to allow for the space of the stitches, the important thing is to be consistent on all pieces.  This is all of section A prepared with seam allowances.


ii.   The first seam is straightforward. Pieces A1 and A2 are placed right sides together, I align the corners of the freezer paper templates on both pieces precisely using a vertical pin and this method, hold the pieces together and the stitch the seam from end to end.  I use a very small stitch, usually 1.5mm so that the stitches are secure and I don't need to secure the seam at the beginning and end.  Piece A3 is added in the same way.  The chimney area above the roof is complete.


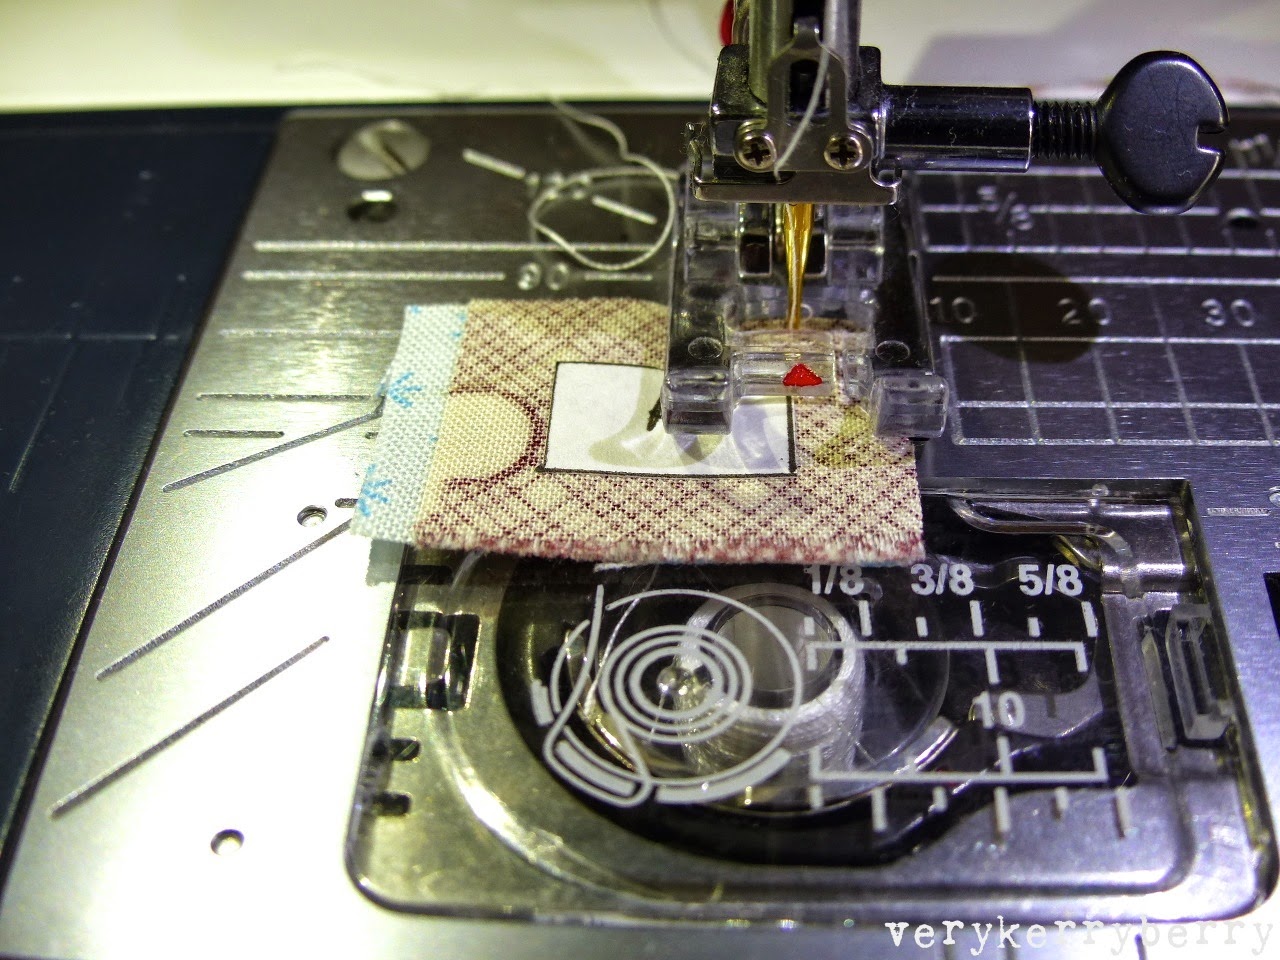
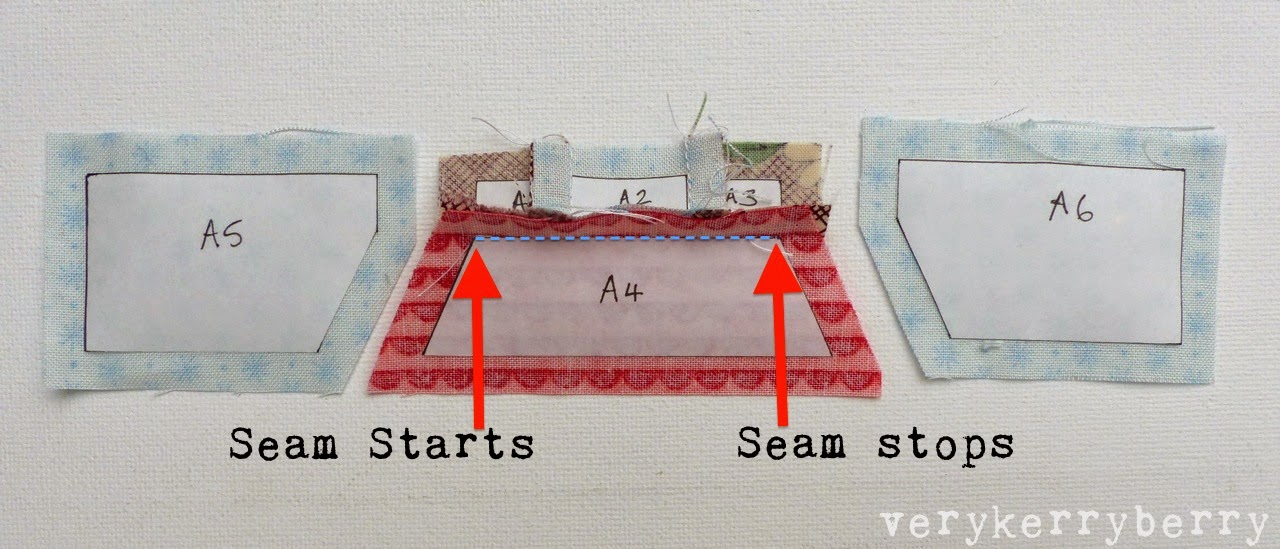
iii.  The next piece involves sewing a partial seam in preparation for the Y seams when pieces A5 and A6 are joined.  When piece A4 is added,  the seam starts where the pieces of freezer paper meet together- see the photo below- and finishes where the freezer paper ends.  The seam allowances are left unstitched. For this type of seam you will need to secure each end of the seam.  Precision sewing is required!  Start by sinking the needle into the precise position by hand or using 'needle down' button, then lowering the foot .  Then sew slowly, three stitches forwards and three stitches back- counting each stitch!   If you prefer, you can hand crank this step. Then, sew forwards stopping exactly where the freezer paper ends and reversing to secure the seam.  It may help to mark the stopping point using a  pencil to give yourself a target to aim for.  If you go over by one stitch when you start or stop the seam you will need to unpick that stitch and sew it again.


iv.  Now, to sew the first part of the Y seam.   I like to sew from the intersection outwards as I find it gives better results and I have chosen to sew the shorter seam first between pieces A1 and A5.  As in the picture below, arrange the fabrics so that A4 is lying away from the seam and the needle is sunk where the intersection between pieces A1 and A5 starts.  As in step iii  above, sink the needle, lower the foot and sew forwards three stitches, backwards three stitches, and then sewing to the end of the seam.


 Repeat the same process starting at the intersection between A4 and A5 (see pic below) and sewing the seam outwards.


The completed Y seam can be seen in the picture below. You can press the seams how you wish.   When I trim the threads from each seam, I like to leave 1/2" of thread tails which discourages any unravelling and stop little bits of thread poking through.


Repeat with piece A6 for the other side of the roof using the Y seam technique in step iv.  That completes section A.  The remainder of the block is sewn by sewing the remaining sections B and C adding the pieces in numerical order using standard seams.   The sections are then sewn together to match the picture.  With freezer paper piecing, aligning the sections precisely when you stitch them together makes for a much better looking block so use the pin technique as before when matching the roof to the house, house to the hill and trunks to the trees. You can even use a little glue basting to get the alignment spot on!


 I added 2 ½" wide sashing around the block and then I hand quilted the block onto wadding.


I added backing and hanging corners and stitched in the ditch around the block.


I used a wide single binding, 2 ¼" wide and sewn on with a ½" seam allowance for a picture frame effect.  You can find my single binding tutorial  here


If you have any questions about freezer paper piecing, email me and I will do my best to answer!  Meanwhile, enjoy the beautiful makes on the blog hop!  You can find the blog hop details below and for those who like to sew along, Al is hosting a 318 quilt-along here.
GIVEAWAY TIME!  To win a copy of 318 Patchwork patterns, comment below saying what you would like to see featured in a paper piece design?  A cat? A hair dryer? A steam train?  Anything you like!  If you are a blog follower you can have an extra entry- just state how you follow in your second comment.  I will need to be able to contact you by email.  I will announce the winner on Friday 24th October.   Giveaway is now closed.
Here are the other hop dates:

318 Patchwork Patterns Blog Hop

·      October 22nd  Penny Layman from http://sewtakeahike.typepad.com
o   Project: Gardening apron with blocks from Vegetables collection
·      October 24th Angela Pingel from http://cuttopieces.blogspot.com
o   Project: Wall hanging or bunting from Halloween collection
·      October 27th Amy Sinibaldi from http://nanacompany.typepad.com
o   Project: Tote bag with appliqué blocks
·      October 29th Amber Carrillo from http://oneshabbychick.typepad.com
o   Project: Blocks from Christmas collection
·      October 31st Latifah Saafir from www.thequiltengineer.com
o   Project: Baby blanket from At the Circus collection
·      November 3rd Charise Randell from http://charisecreates.blogspot.com
o   Project: Make up kit and shoe bag from Girls’ Night Out collection
·      November 7th Amy Friend from http://duringquiettime.com
o   Project: Table runner with blocks from Fruits collection
·      November 5th Leila from http://wheretheorchidsgrow.blogspot.com
o   Project: Tea Cozy from Tea Time Collection
·      November 12th Caroline from www.sewcanshe.com
o   Project: Tote or pouch with appliqué block
·      November 10th Faith Jones from www.freshlemonquilts.com
o   Project: Mini quilt from Vehicle Collection
·      November 14th Rashida Coleman-Hale from http://iheartlinen.typepad.com

sib blog